
This is what you'll be creating.....

Step 01
Fire up your Autodesk 3Ds Max version and under create tab go to Shapes→Splines→Text
Under Parameters use any font you like and chose any size.
Then in the text box type the name of the title that you want to make.

Step 02
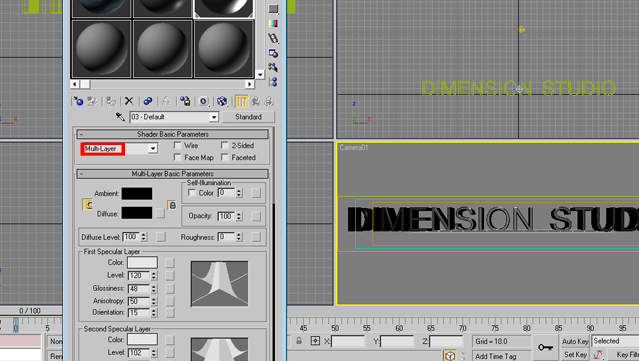
When you've finished click on the Front view port.
You'll be able to see your title.

Go to modify tab
Drop down the modifier list and click on the "Bevel" modifier.

Play around with the bevel values.I've gone up to the 2nd level but if you want more detail you can use the 3rd level....

Next press m to enter to the material editor.
Select a blank slot and under Shader Basic Parameters change "Blinn" to Multi-Layer
Under first Specular Layer, Change : Level - 120
Glossiness - 48
Anistropy - 50
Orientation - 15
Under Second Specular Layer, Change : Level - 102
Glossiness - 17
Anistropy - 0
Orientation - 0

Under maps go to Reflections.
Click none.
Then you'll get a window called Map Browser.
Select "Mask"

You'll be directed to a new window(not exactly a window).
Under mask properties click on None which is infront of Map.
Then you'll be directed again to the Map browser.
Select "Raytrace".
You don't have to do any change.just click on "Go to parent" (as shown in the image)


Under mask properties click on None which is infront of Mask.
In the map browser select "Falloff" this time.

Under Falloff parameters change Falloff type to "Fresnel"
Go to Mix curve and try to create a similar cure like in the image.


After you've done all the above the metal material is ready to be assigned to your title.
Click on the Assign to object button as shown in the image.(I've already done that.that's why the button is not available for me)

Here comes the real deal.The previous steps were actually like points....just joking :)
Ok.Lets create some lights.Under create tab go to Lights→Omni
Create to lights as shown in the image.
N:B-Place the light correctly otherwise you won't be able to see the title.
So use the viewports and place correctly.
You can do a quick preview render by pressing F9.

Select the omni infront of the title an dunder General Parameters check on the "on" box.
Drop down the shadow type menu and select "Ray Traced Shadows"
Change the multiplier value to about 0.4(depends)

Let's play with the render settings...
Go to Rendering→Render
Under Common;Chose Single(1 image)
I you've animated the title,use "Range"
Under output size chose any preset.
If you want to use a custom size use the boxes to change the values.

Step 12
Go down and click on "Files"(To chose the destination for your output)
Enter any name for your file ad chose an output format.
I strongly recommend you to use targa format as it only renders what you've created.(No background)
If you render an avi file you'll have to mask the background.So "targa" or "tiff" is the best option.
Under Assign Renderer.Click on the button.(Default 3Ds max renderer is the "Scanline Renderer")

Under choose renderer select "mental ray Renderer"
Then click Render.
Here you go...You've created a metal 3D text.Congratz :)
If you want to obtain a really really smooth output you can create a ambient occlusion material and composite both renders in Photoshop or AE or whatever the software you would like to use....
If you don't know to create an ambient occlusion material,Don't worry folks i'm planning to post another tut on that.Stay tuned.......

Guys,If you enjoyed the tutorial feel free to comment.And If you've any problem please post it as a comment.I'm available to help you....So Bye for now :)
BRION MARIO (DIM)


0 comments:
Post a Comment